Wednesday, October 17, 2012

Our Favorite Trees

As I mentioned last week, my family and I have a big move ahead of us and we are getting a bit sentimental about leaving this area.  While we are very excited about the opportunity to move west, it is a bit bittersweet as big moves tend to be.  We've made some amazing friends, especially over the last couple of years as our girls have entered school.  We also have an idyllic piece of property - one in which we feel completely comfortable letting the kids and dog roam and explore the many natural treasures found on it.  (Okay, so sometimes I'm not so happy with the "treasures" that the dog finds...)

This past weekend, my husband had the idea of documenting our favorite trees on the property.  So, Sunday afternoon we went on a ramble and each of us picked out favorite tree and took pictures with it.  We also had to share why it was our favorite tree - I thought the girls' answers would be a fun thing to look back on in the future.  As this blog is as much a place for me to document some of our family's activities as well as a place to share fun science things to do, I thought I would share.

If you want to do this, its helpful to have a way to identify the trees.  There are several good pocket guides (I like any of the Peterson ones) as well as apps (such as from the National Audubon Society).  I had a few other resources listed in our seed hunt activity from last fall and recently found the Tree Leaf Key from About.com which does a pretty good job describing the characteristics of the different leaves.  Another thing you can do is visit a local arboretum, park or college campus that has identified and labelled many of the trees for you.  It would be great fun to document your child in front of their favorite tree each year to see how each has grown over the years.

Monday, October 8, 2012

Weathering and Erosion with Found Rocks

Yoohoo?  Hello?

Hi.  It's me again.

School is back in session, the leaves are turning color and I have a huge variety of science activities rolling around in my brain that I am ready to share!  Sorry for the prolonged absence... this summer became more than a bit crazy for our family.  

In June, we were strongly considering putting our house on the market and started to do some of those little projects that have been hanging around for a little (long) while.  In July, my husband quit his job to pursue an exciting start-up company so then we really did have to put our house on the market.  (Which is not an easy feat with three young kids - thank you, thank you to my family and friends that helped us out so much!)  We got the house on the market in early August, sold it in early September, and are closing this week.  We make our official move in early November.  Oh, and did I mention this is not a small move... we are moving to California!  I think that phrase, "Life is a moving target", was invented for me this past summer!

Anyway, this activity evolved while we were in California looking for a new community in which to call home.  (We are moving to the San Diego area.)  We stayed for a week in two different locales and spent time each day exploring the area's offerings, from parks to restaurants.  And, of course we spent one day at the beach!  My little rock hunters continued their collecting ways and found a couple of rocks at the beach as well as a few at some of the more mountainous hikes that we took.  I was struck in the very clear difference due to weathering between the rocks and allowed the girls to take them home so we could do an activity with them.

Note: And, yes, I do believe in the idea of Leave Only Footprints - and got lectures by both my hubby and best friend when I let the girls take their rocks home.  I hereby promise to return the rocks to their rightful homes once we move.  (Happy, M & H?)

Materials Needed:

  • Collected rocks from "beach-type" and "mountain-type" locations
  • magnifying glasses
  • sandpaper
  • science journals

Thursday, May 24, 2012

From Caterpillar to Moth: Ctenucha virginica


I call him "Stan". 

Yes, yes, I have heard the arguments against anthropomorphizing, especially with children, but, really, "Ctenucha" is such a mouthful. 

So, Stan he is. Until he hatches anyway, and then he might just be "Stanette". 

Maya found him yesterday clinging to the side of our plastic pool.  It is the larvae ("caterpillar" or, as Maya says, "killerpatter") form of the Ctenucha virginica moth. We found our bug jar and the girls dug out their magnifying glasses and spent some good quality time investigating our new friend.


Sunday, April 22, 2012

Recycled Mini Greenhouses

Happy Earth Day! We love Earth Day at our house; not just because of the concept behind it but also because it is the anniversary of our engagement!  11 years.  Which means that this year marks our 10th wedding anniversary - wow!  

Anyway, back to Earth Day... To celebrate this year, Maya and I raided our recycling bin and made some mini greenhouses in which to start our seeds.  Okay, to be honest, the toilet paper tubes hadn't even made it to the recycling bin.  I have an issue with disposing (even recycling) toilet paper tubes.  I keep thinking, "There has to be something I can do with this."  So, rather than throw them in with my other recyclables, I end up lining them up on the window sill behind the toilet waiting for inspiration to strike.  My friends that use my bathrooms must think I'm very odd.  Check that.  They already know that I'm odd, it's the visitors that happen to use the bathroom that must think I'm very odd.  Oh well.  

Sunday, April 15, 2012

Dissecting Bean Seeds

Spring has definitely arrived here and I am itching to get outside in the garden.  We have big, maybe too big given our newborn, plans for the garden this year including a square foot gardening project for the older girls.  (That particular project involves power tools - hooray!)  We just received some seeds we ordered in the mail this week from Seeds of Change (a great source for organic seeds - we got some San Marzano tomato seeds this year because I hear they make an amazing sauce!) and I made the comment about every seed having a baby plant inside.  The girls, as you can imagine with a new baby in the house, are fascinated by babies right now and wanted to see the baby plant so we decided to dissect some beans!
Materials Needed:
  • variety of dried beans - we used a bag of mixed dried beans intended for soup
  • water
  • paper towels
  • 5 plastic containers
  • magnifying glass
  • markers - I recommend permanent (for adult use!)
  • science journal

Tuesday, April 10, 2012

Our New Owl - Welcome Baby Gabby

Well, I haven't posted anything for a while but for a pretty good reason, I think.  We welcomed our third daughter, Gabrielle Elyse, into our family on March 10th.  She's doing wonderfully and I've spent the last month in a state of newborn bliss - with all the sleep deprivation and good baby smells that it entails.  I've had some time to think about Momma Owl and though I debated taking a longer sabbatical, I have some science activity ideas I'd still like to share and I appreciate the creative outlet that Momma Owl has become for me over the last six months.  I may change things up a bit and incorporate some quicker activities that may better fit my (and maybe yours, too!) family life right now.  We'll see how it goes... Wish me luck - and some sleep!


Saturday, March 3, 2012

Stick Forts and Brush Piles

We've been out exploring again and I wanted to share a fun activity that you can do if you have an abundance of sticks near your home - stick forts!  Kids love forts of all kinds, from those they create inside with chairs and blankets to little niches they find for themselves outside.  When I was young I lived in an apartment complex and one of the best things about it (besides having lots of kids to play with around - I always wanted to play school, if you can imagine that...) was that in the winter the plows would create massive piles of snow in the parking lot.  And, when I say massive, I mean MASSIVE - maybe 10 to 15 feet tall and three or four times as wide.  We quickly turned the snow piles into pretty elaborate snow forts, complete with a place to stock pile snow balls and dungeons.  This activity taps into that love of forts by creating a natural stick fort and in the process you can relate their new fort to how brush piles are used by small animals as both shelter and as a place to raise young.

Materials Needed:
  • sticks of a variety of lengths - pretty easy, right?

Friday, February 24, 2012

Glitter Jars

I've seen these jars all over Pinterest the last couple of months or so, sometimes called "mind jars" and sometimes called "calm-down jars", and thought they might be a fun craft to make with the girls.  (Okay, okay, so I'm totally dating myself here, but they remind me of the plastic glitter wands from the 80s and I really wanted to make one for myself.)   Basically, mind jars are a tool to help kids, or anyone, when they feel overwhelmed.  They are clear jars (either glass or plastic) that are filled with a solution of liquid and glitter.   The glitter represents all the troublesome thoughts that are creating the stress.  They are shaken to mix up the glitter and as the glitter settles to the bottom, you are supposed to visualize the things that are troubling to you also settling.

A note about Pinterest: when I pin things on Pinterest, I really try to click through to make sure that I'm linking to the original post so that the original blogger gets the credit (although sometimes it is hard).  

As far as I can tell, the post Meditating with Children on "Still Life with Circles", is the first post I can find about the jars.  It refers to the book, Moody Cow Meditates that has a recipe for the jars in the back.  There are also a couple of lovely, later posts on Mind Jars and Calm-Down Baskets at "Here We Are Together", which actually describes a different method of making them than from the book.  The first couple we tried to make failed miserably.  In one, we added the big, fat (cheaper) glitter and it, literally, settled in about 10 seconds flat.  Not what we were looking for.  In the second container, we added Elmer's White Glue, which turned it into an opaque mess.  Also, not what we were looking for.  So, a few days later, after looking at the different recipes and thinking about the science behind what makes them work we decided to make an experiment out of creating the glitter jars.   

(I'm talking about the science of the jars here, not the science of meditation - I'm definitely not qualified to talk about that because I haven't been at all successful with meditation.  The closest I get to stilling my mind is in my yoga class - and I haven't been there nearly enough lately!)

Materials Needed:
  • jars - we used half-pint glass mason jars
  • glitter - the fine stuff
  • hot water
  • whisk
  • bowl
  • light corn syrup and/or glycerine (found in the pharmacy section)
  • glitter glue
  • dish soap

Saturday, February 18, 2012

The Great Backyard Bird Count

Do you have an extra 15 minutes this weekend?  Perhaps you have no school on Monday for President's Day and are looking for something to do?  If so, think about participating in the The Great Backyard Bird Count.  This is a great citizen science project run by the Cornell Lab of Ornithology (in my hometown!).  Basically, all you need to do is observe the species and birds you see over a 15 minute (or more) period and then submit the data online.  The data needs to be collected by the end of the day on Monday, February 20, 2012, but you have a bit more time (until March 5th) to actually submit the data.

The ornithologists at Cornell will use the data to create a picture of where the birds are during this weekend from all over the country.  The data from this weekend, and from counts in the past, help answer questions like how the winter's weather has affected bird populations, if migrations will be similar or different from previous years as well as if any species are showing worrisome declines in population.

The Great Backyard Bird Count website has a wide variety of resources to help you in your task.  There are more detailed instruction for collecting and submitting the data, including some PowerPoint presentations.  Not sure of which birds you might see in February in your area?  You can type in your zip code and get a regional bird list.  There is also a whole section for kids, including coloring pages.  And, you can watch the data as it comes in and see other counts that are coming in from your zip code.  How cool!

And, inspired by the bird count this weekend, Maya and I (along with some friends) made some shaped bird feeders for our feathered friends.  We followed the directions from this post on the Eighteen25 blog. Here's a pic of our finished product (I think its supposed to be an apple?):


It is very easy to do (only requiring gelatin, water and bird seed) but I wouldn't recommend doubling or tripling the recipe, unless you have a virtual army of kids you are doing this with.  One recipe made two large cookie cutter bird feeders - but the mixture cools off pretty quickly and, once it does, it loses its stickiness and makes it hard to put into the mold.

Thursday, February 16, 2012

Dissolving Sweethearts

Well, Valentine's Day has come and gone (happy belated, everyone!) and, yet again, we have a stash of candy that we are slowly/quickly working our way through.  My girls are not especially fond of the ubiquitous Sweethearts candy (nor am I, to be honest) - you know the powdery ones with the messages on them - so we've been brainstorming things to do with them.  Here's what we came up with...

Materials Needed:
  • Sweethearts candy - at least four of the same color, as well as a few additional of other colors
  • bowl with water
  • four clear liquids - we used water, tonic water, vinegar and sparkling water
  • four containers - we used Wilton's Love Potion Sprinkles containers (okay, I have to admit that I bought these because I really liked, and wanted to reuse, the test tubes more than because of the sprinkles themselves) but plastic cups would have worked as well.

Friday, February 10, 2012

Winter Nature Hike


In November, I read an interesting interview on Outside Mom about trying to get your kids outside everyday, even it is just for 15 minutes.  I wouldn't classify it as a new year's resolution exactly, because that would doom it to failure, but it has remained in my mind ever since.  As the weather has remained positively balmy, for February anyway, and we've been a bit home-bound with some winter bugs going around, we decided to take a winter nature hike.  Winter is actually a great time to do a nature hike because the lack of foliage allows for better observation for some things that are normally hidden.  Plus, animal tracks are often more apparent in both the mud and the snow that are typical of winter.

Materials Needed:
  • weather appropriate clothing
  • method of recording findings - science journal or digital camera
  • guidebooks (optional)

Process and What's Happening?
This is a very free-form activity.  Encourage your child to use their five senses as you take your hike.  Obviously, I'm not encouraging using taste during this particular activity (yellow snow...eew!) but they can definitely use the other senses.  The sense of sight is so dominant for some people, it is often helpful to have your child close their eyes when you are working on another sense, like smelling or hearing.  Think about what people do when they are trying to find something buried in the bottom of their bag or purse - almost always, without realizing, they close their eyes as they rely on their sense of touch to find the missing object.  We were able to hear many more different types of birds with our eyes closed than we could actually see; even a black-capped chickadee, which is indicative of what a warm winter it has been because they don't normally migrate back up to Michigan until March.  I highly recommend the Audubon Birds app, available in the iTunes store, although it is a bit expensive at $20 although if you watch the site they periodically have an offer when you can get all of the Audubon apps for only $20 total, which is a really good deal.  The National Audubon society also has a free online guide to birds - with most of the same information as the app - but less mobile. 

Do find a way to document the experience.  Older children could draw pictures and write descriptions in a nature journal.  As this might be hard for younger kids, use a digital camera to document your walk.  If possible, let your child take control of the camera to take pictures of what you find on your hike. Once you are done, you could print a collage photo, like the one at the top of this post - I used Picasa for it, but a lot of the photo labs (Target, Walmart, grocery stores) etc. will let you do it fairly inexpensively.  You could also print all of their photos out and put them into a small album for them to review later.

Some things that you might be able to observe on your winter nature hike are discussed below.

Animal Shelter
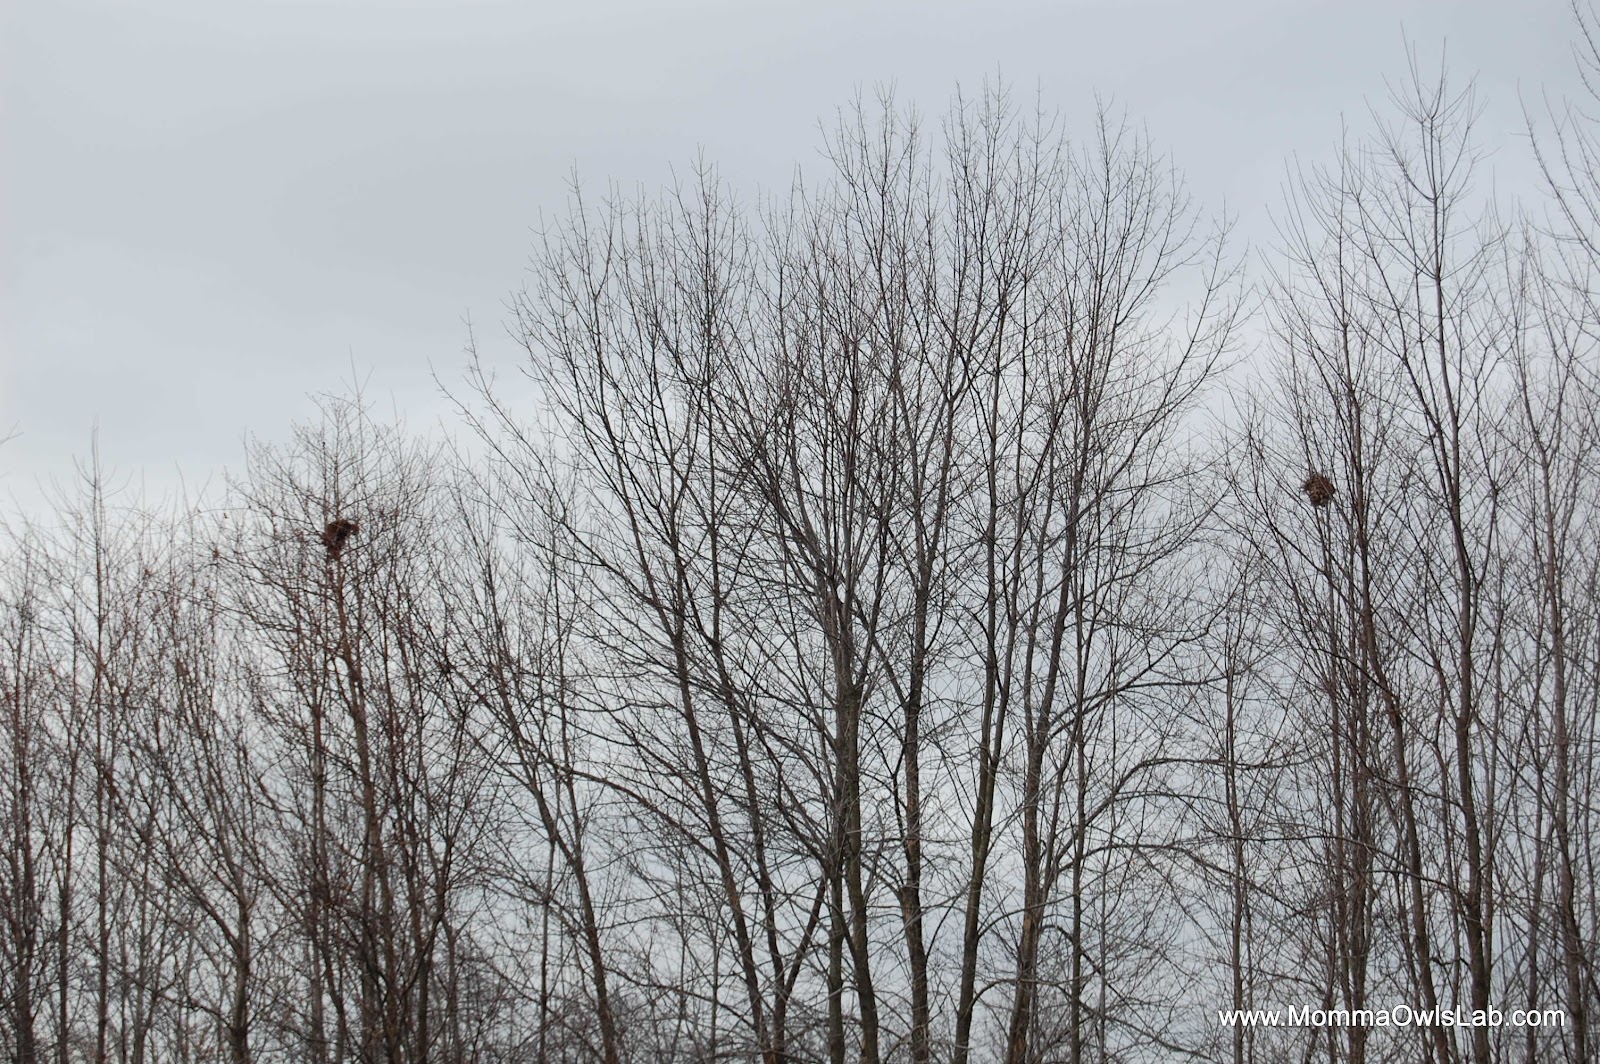
With the decreased foliage, birds nests are much easier to see so be sure to direct your eyes upward.  We were able to find three nests at the tops of three trees that were very close to each other (only two were captured in the picture below).  As they are fairly large nests, I believe at least one of them belongs to our local red-tailed hawk pair.  (We are super lucky to have a pair that lives so close to us - their courtship flights in the spring, with the male swooping and diving - are truly something to be seen!)

You also might be able to find brush piles that normally would be hidden in the summer.  You can talk to your child about how the small entry points into the brush pile make it easy for small animals to get in and out but prevent the larger animals that often prey on them from entering.  If you look carefully, you might be able to find other signs of small animals (squirrels, chipmunks, etc.) like tracks or acorns.


Animal Tracks
Winter is a great time to look for animal tracks, both in the snow and the mud.  This is a great opportunity to practice making inferences, or educated guesses, about what might have made the tracks.  To help, Bear Tracker is a great resource for identifying tracks, including a free two-page track of common tracks in North America.  We found deer, dog and rabbit tracks.  If we'd had some Plaster of Paris, it might have been fun to try to cast them as well.  If you don't have Plaster of Paris, you can always mix your own using white glue or flour - although I'm not sure how it would set up in the cold temperatures.  Something to try another time...


Food Sources
Look for seed heads and berries that may be a food source for the local birds and other animals.  We found some winter berry plants and the girls picked some flowers for me - seed heads of Queen Anne's Lace, which I think we'll tie together and put on our nature table as it tends to be a little sparse in the winter time.

Adaptations
A nature hike in winter is also a great time to talk about adaptations that help plants and animals survive the colder temperatures.  You can ask your child to compare the animals they might see in the summer with the ones they see in the winter.  Where do the animals go?  You can use this as an opportunity to talk about both migration and hibernation.

In terms of plants, you can talk about the differences between deciduous and coniferous trees and shrubs.  In general, deciduous trees and shrubs become dormant and drop their leaves in order to protect themselves against the lack of water that they face in the winter (snow pack doesn't count).  Coniferous trees and shrubs, sometimes called evergreens, are able to keep their leaves (waxy needles) because the specialized needles are able to control for loss of water.  (Note: there are some coniferous trees that do drop their needles, like larches.)  During your hike, you can practice classification by pointing out the different trees you come across and have your child identify whether it is a deciduous or coniferous tree or shrub. 


Extensions:

There are lots of books about winter for young children.  A few that we like, include When Winter Comes, by Nancy Van Laan, Animals in Winter by Henrietta Bancroft and Big Tracks, Little Tracks by Millicent Selsam.  If you have used a digital camera to document your hike, it might be really fun to write your own book and then print it on one of the photo lab sites like Shutterfly or Kodak Gallery.  

If you want to explore animal tracks further, think about using small plastic animals to make tracks in play-doh.  Two Chicks and a Hen has some great pictures of their footprints activity using the playdough recipe from Ten Kids and a Dog.  (I just love both of those blog names!!)  I also really like this Animal Track Booklet activity from My Montessori Journey that uses free animal track cards from Montessori for Everyone.

Finally, this might be a great opportunity to start a nature table or bowl if you don't already have one with pinecones or seed heads or pictures that you took from your winter nature hike.  A nature table is a small space, usually at kid height although depending on the ages of your little ones you may have to rethink that, on which to display some of their findings from their explorations in nature.  If you have limited space, a bowl may be used instead.  Sometimes people create miniature scenes using fairies or gnomes and other times its more of a collection.  I'll try to write more about our nature table and post some pictures in an upcoming post.

Science Process Skills Used In This Activity:

Observing Communicating Classifying Measuring Inferring Predicting
X
X
X

X


I hope you enjoy this activity!  If you try it, please let me a comment to let me know how it goes!
Pin It

Friday, January 27, 2012

Crayon Rocks


We've had a very, very warm winter here in Michigan.  With such little snow, the ground has been exposed and my little rock hounds have been collecting rocks again.  I thought we'd revisit the types of rocks again (sedimentary, metamorphic and igneous) - but this time give them a more active and visual way to think about how each are formed.  There are many examples of creating rocks from crayons, but this pdf from the the Exploratorium is very helpful.

Materials Needed:
  • crayons, several of each in four different colors
  • crayon or pencil sharpener
  • 4 containers for holding the crayon shavings
  • 3-6"x6" pieces of aluminum foil
  • popsicle stick or other disposable stirrer
  • mug
  • boiling water

Process:
Unwrap the crayons and use the sharpener to create shavings.  You can also try to make the shavings use a penny or a plastic knife, although we found that the sharpener was easier and more productive than the penny or knife especially for the little ones.  Make sure to keep the shavings separate from each other at this point.


Sedimentary rocks
Sedimentary rocks are formed from sediments (tiny rock particles that were created by weathering or erosion) that were layered and then compressed.  To replicate this with the crayon shavings, take one of the aluminum foil squares and have your child sprinkle each of the colors of shavings into the middle of the square, one at a time so they will form the layers.

Fold the aluminum foil up tightly around the shavings and then compress it.  To do this, they can press on it with their hands, step on it, place it in a clamp or use your creativity to think of other ways.  .

This does take a while to get the crayon pieces to stick together and we found that a little body heat "helps" the process along.  Carefully unfold the foil and remove the sedimentary rock with care as this is the most brittle of the rocks that you are making.
A sedimentary crayon rock.


Metamorphic rocks
Metamorphic rocks are formed when existing rocks are exposed to heat and/or pressure.  To mimic this, take another square of aluminum foil and pile all four colors of shavings in the center.  Fold up the sides of the aluminum foil to make a boat.  Pour boiling water into a mug (adult job!) and float the boat in the hot water for 15 to 20 seconds, just until the shavings have started to melt.

Quickly remove the boat and fold the foil in half so that the shavings are compressed a bit. Let it cool and solidify and then open the foil and remove the metamorphic rock.
A metamorphic crayon rock.

Igneous rocks
Igneous rocks are formed when magma (molten rock) cools and solidifies.  To make an igneous crayon rock, repeat the steps for making the metamorphic rock, except leave the the aluminum foil boat floating on the hot water for a minute or more until all the crayon sediments have melted.  (This may take more or less time depending on the brand of crayons that you have used.)  Then take the popsicle stick and stir the shavings until they are all mixed together.  Remove the boat and let the crayon cool and solidify.
An igneous crayon rock.
If you are using a science journal to record your child's experiments, then you can have them record either the process of making each type of rock or draw a picture of what they looked like at the end (or both).

What's Happening?
There are three types of rocks (sedimentary, metamorphic, and igneous) which, given the right conditions, can be changed from one into another.  This is known as the rock cycle, pictured below.

Sedimentary rocks are formed from the compaction and cementation of rock sediments and often have distinguishable layers.  They also may have fossils of organisms or other visible rock particles in them.  Metamorphic rocks are formed when existing rocks are exposed to heat and/or pressure; they often have distinct bands or blocks of crystals in them.  Igneous rocks are formed when magma cools and their characteristics, including crystal size, depends on how fast the rock cools.  If it cools quickly on the surface of the earth (extrusive igneous rocks), the crystals are small and pores may be apparent.  If it cools slowly under the earth, the crystals have a chance to grow larger.  More information of rocks can be found in our Creating a Rock Collection activity.

Extensions
One thing you could try is to create intrusive vs extrusive igneous crayon rocks.  Follow the directions to make two igneous rocks, but cool one in a glass of ice and the other at room temperature.  Examine the resulting "rocks" with magnifying glasses to see if there is any difference between them.  Please let me know if you try this - this is just a brainstorm idea and I really would like to know if there are any visible differences. 

If you are looking for a good children's book describing the rock cycle, we like the book "The Rock Factory: The Story about the Rock Cycle".  It probably is best for early elementary age kids.

Finally, you could try to make the different types of rocks with chocolate.  I'm thinking white, milk and dark chocolate.  Food + science - what a yummy combination!

Pin It